The Magic And Mystery Of Challah
The Magic And Mystery Of Challah
I - A Brief Introduction
I - A Brief Introduction
The following post has been created over a period of time and is fairly long - so forewarned is forearmed! (If you are reading this on a web site which is not Help! I Have A Fire In My Kitchen and it gathers in RSS feeds, you may not be seeing the whole article. So if you are interested in this piece, make sure you click over to Help! I Have A Fire In My Kitchen.)
The idea for this piece on Challah, came to me a long time ago, when our insane but great cook, Paula, submitted her recipe for Braided Challah Bread. Somehow though, my desire to place a full and comprehensive recipe for making Challah always went to the back burner due to pressures of time. Then one day, while I was preparing the post on Donuts & More Donuts... which Carolyn over at Juggling Frogs was gracious enough to allow me to repost here @ Help! I Have A Fire In My Kitchen when her "Virtual Challah Lesson Index" caught my eye. Carolyn, in a few posts had provided all the necessary instructions for making Challah in a few ways with some great pictures to boot. The problem was that Carolyn had divided the process of making Challah into a few posts and thus it was not all laid out in one flowing piece. So being full of Chutzpah as usual I asked Carolyn for permission to repost what she had created over @ Juggling Frogs in her Virtual Challah Lesson Index here @ Help! I Have A Fire In My Kitchen. She readily agreed.
However, I am going to do a bit more explaining than Carolyn has in her posts. Carolyn assumes that most if not all of her readers, are familiar with Jewish customs and traditions and trust me on this - Challah is one Jewish custom! She also assumes a fair amount of "kitchen smarts". So as we go through this post, I will clearly point out the pictures and instructions from Juggling Frogs and also try to make it clear where I am adding some description or reason for certain things. But if you prefer the quick and easy, just head over to Juggling Frogs and peruse the Virtual Challah Lesson Index.
One other point worth mentioning. Yes, you can use your bread machine to make any sort of bread you like. But still there is truly nothing like the taste and smell of home baked Challah. If you have the patience and time well here it is. And even if you don't ever expect to bake bread or Challah the old fashioned way, it still is a skill to learn for your kitchen. Enjoy. Now on with the show!
II - What is Challah?
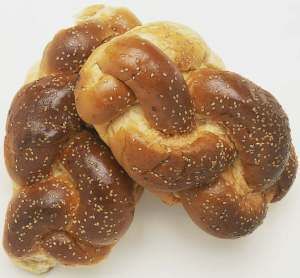
Most traditional Jewish meals begin with "the breaking of bread". Challah is a special kind of bread used for Shabbat, holidays and on special occasions such as a Circumcision, Wedding, Bar & Bat Mitzvah etc. It is a usually, though not always, sweet, golden, and a type of an eggy bread. The taste and texture of these egg-laden "Challot" (Challot is the transliterated Hebrew plural for Challah". Challah is singular; Challot is plural.) is somewhat similar to egg twist rolls (those little yellow rolls that look like knots). However, Challah can be made from "whole wheat" (very popular these days) and in many other fashions and ways.
Remember, since this bread, the "Challah", is used on Shabbat (Transliterated Hebrew for "Sabbath"), it is on a traditional Jewish table at least three times a week and at least 5 loaves are required (though they can be small loaves!) Why? Because on Shabbat and Holidays, we require two loaves to begin the meal and we eat three meals. However on the third meal of the Shabbat there is no requirement for 2 loaves and one will suffice. So assuming you are going to at least break all the loaves (though certainly that does not always happen unless there are a few people) 2X2=4 (Friday Night = 2; Saturday Main Meal = 2) +1 for the meal on Shabbat afternoon which is five loaves all told.
Additionally, the loaves used to begin the meal, the ones that the blessing before eating bread is recited - must be whole. Which means you cannot begin the main Shabbat meal on Saturday, making the traditional blessing over bread) by using a loaf half-finished from the Shabbat Friday Night meal. Though of course you can eat that loaf from Friday night during the meal itself. And if a whole loaf is left over from Friday Night that can be used to make a blessing over on Shabbat.
Thus as you may be able to tell, Challah is kind of a central factor in Shabbat and Holiday meals, and of course, baking and selling it is big business as well.
By the way we should clear up one faulty assumption. You do not need specifically Challah for the meals. You can use normal rolls or pita bread or whatever bread you have as long as it is whole. Challah is simply a "festive bread".
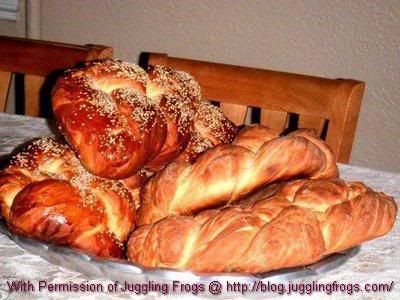
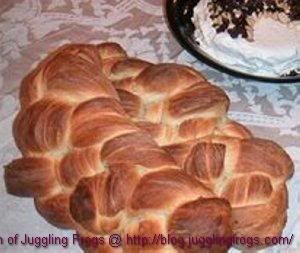
Whole Wheat Braided Challah
The loaf is usually braided, but on certain holidays it may be made in other shapes. For example, on Rosh Hashanah (the Jewish New Year), and on Shavuot (Pentecost) it is traditional to serve round Challah (the circle symbolizing the cycle of life and the cycle of the years as well as the mystical symbolization of the "Ein-Soph" - "the Never End").
Some Different Types Of Challah
The etymology of the word "Challah" is fairly simple though connected to a fairly complicated practice. In order to fully explain I am going to quote from an excellent article in Wikipedia on Challah.
The term Challah refers to a small piece of dough — about the size of an egg — that is traditionally separated from the rest of the dough before braiding. In biblical times, this portion of dough was set aside as a tithe for the Jewish priesthood (see Numbers 15:17-21). In Hebrew, the ritual is called "hafrashat challah."
Today, this commandment applies more to professional bakers than the home cook, as it involves batches of challah using more than 2 kilos of flour.
The Bible does not specify how much dough is required for challah, but this issue is discussed in the Talmud. The rabbis said that 1 part in 24 was allocated to the priest in the case of private individuals, and 1 part in 48 in the case of a baker. If the baker forgets to set aside challah, it is permissible to set aside the same portion of bread.
According to the Talmud, the requirement to separate challah from the dough was imposed on the owner of the dough, not on the person who kneaded it; hence if the owner was not Jewish, even if the kneader was, hafrashat challah was not mandatory. The requirement did not apply to quantities of less than one omer in size, to bread prepared as animal feed; to dough prepared from a flour derived from anything other than wheat, barley, oats, spelt, or rye. Although the Biblical expression when you eat of the bread of the land might be understood as applying only to bread eaten in the Land of Israel, classical rabbinical sources argue that hafrashat challah should be observed in the Diaspora.
Since the destruction the Temple, no one is considered ritually pure. The idea of "priestly descent" still exists, and the title of "cohen" is passed down from father to son, but there are no rites comparable to those practiced in the Temple. Hence the custom of separating "challah" is a symbolic act, with a blessing recited before the dough is separated and thrown into the fire or discarded.
Challah was a means of sustenance for the kohanim, who had no income of their own. This is a point upon rabbinical sources and modern scholars agree. The Priestly Code, containing the law of challah, is believed by textual scholars to be a series of accretions to the earlier priestly source, and to postdate the law codes in the Torah. Thus the instruction concerning challah is believed to be a later development, perhaps reflecting the emergence of a full-time professional priesthood.
Many deeper insights are cited for challah in the Midrashic and Kabbalistic literature. The mitzvah of separating challah is traditionally regarded as one of the three mitzvot performed especially by women (the others are lighting the Shabbat candles and family purity).
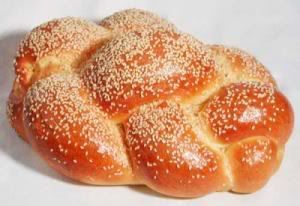
Freshly Baked Challot
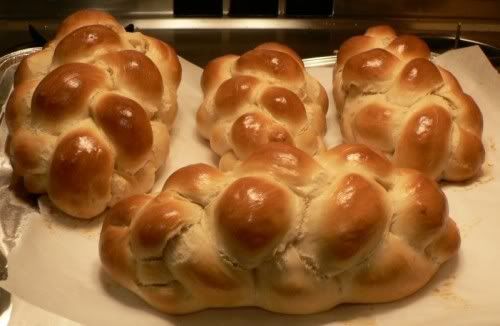
In order to summarize. The word Challah refers to that portion that was given to the priests from the whole batch of dough. Since the destruction of the Temple we do not practice any of the commandments in regard to Priestly portions and tithes for the priests and levites, a blessing is made over the separated part of the dough and then it is burned. This discarded piece of dough is actually the "Challah". The laws of challah apply to any large quantity of dough or batter intended for baking. There is no difference between challah dough and oatmeal cookie dough; "challah" must be separated for both. (Last statement now edited according to correct comment by Mother In Israel. Thanks go to her!)
However, in modern days, the term Challah has come to mean the whole bread eaten on Holidays etc. Today the separated portion (in keeping with the original Challah) is usually placed in the oven and allowed to burn and then thrown away. Today though, our festive special bread is called Challah.
I hope that was not too complicated but now we know where the word Challah came from and what it actually is, let us go on to discovering how to make it!
III - Yeast & It's Magic - The First Step
In order to get dough to rise one requires yeast. For a moment, let us take a look at this "little creature" that works wonder on dough, and what it actually does. In Wikipedia we read:
Yeast, specifically Saccharomyces cerevisiae, is used in baking as a leavening agent, where it converts the fermentable sugars present in the dough into carbon dioxide. This causes the dough to expand or rise as the carbon dioxide forms pockets or bubbles. When the dough is baked it "sets" and the pockets remain, giving the baked product a soft and spongy texture. The use of potatoes, water from potato boiling, eggs, or sugar in a bread dough accelerates the growth of yeasts. Salt and fats such as butter slow down yeast growth. The majority of the yeast used in baking is of the same species common in alcoholic fermentation. Additionally, Saccharomyces exiguus (also known as S. minor) is a wild yeast found on plants, fruits, and grains that is occasionally used for baking
It is not known when yeast was first used to bake bread. The first records that show this use came from Ancient Egypt. Researchers speculate that a mixture of flour meal and water was left longer than usual on a warm day and the yeasts that occur in natural contaminants of the flour caused it to ferment before baking. The resulting bread would have been lighter and more tasty than the normal flat, hard cake.Today there are several retailers of baker's yeast; one of the best-known is Fleischmann’s Yeast, which was developed in 1868. During World War II Fleischmann's developed a granulated active dry yeast, which did not require refrigeration and had a longer shelf life than fresh yeast. The company created yeast that would rise twice as fast, cutting down on baking time. Baker's yeast is also sold as a fresh yeast compressed into a square "cake". This form perishes quickly, and must be used soon after production in order to maintain viability. A weak solution of water and sugar can be used to determine if yeast is expired. When dissolved in the solution, active yeast will foam and bubble as it ferments the sugar into ethanol and carbon dioxide.
When yeast is used for making bread, it is mixed with flour, salt, and warm water (or milk). The dough is kneaded until it is smooth, and then left to rise, sometimes until it has doubled in size. Some bread doughs are knocked back after one rising and left to rise again. A longer rising time gives a better flavour, but the yeast can fail to raise the bread in the final stages if it is left for too long initially. The dough is then shaped into loaves, left to rise until it is the correct size, and then baked. Dried yeast is always used for bread made in a bread machine.

This also from Yeast Genome:
O .k. Phew! Now we know all we ever did not want to know about Yeast! Yeah! But trust me, if you have read up until now you will understand the process of Challah Baking that much better. So let us now move on to the first Challah you can make.The yeast's function in baking is to ferment sugars present in the flour or added to the dough. This fermentation gives off carbon dioxide and ethanol. The carbon dioxide is trapped within tiny bubbles and results in the dough expanding, or rising. Sourdough bread, is not produced with baker's yeast, rather a combination of wild yeast (often Candida milleri) and an acid-generating bacteria...
IV - A Normal Challah Recipe Step By Step
Ingredients:
- 17 fluid oz. warm (115 degrees F or less) water
- 2 Tbsp. (or two packets or one coffee scoop) active dry yeast
- 1/2 cup sugar
- 1 Tbsp. salt
- 3 eggs
- 1/2 cup oil (=4 fl. oz)
- 2 ½ lbs. bread flour (higher gluten than all-purpose flour)
- Mixer
- Mixing Bowl
- At least 1 or 2 Pans (flat and long)
So now we know all about the yeast monster let us begin with specifics and let us move to Carolyn's Yeast instructions at Juggling Frogs. (Bold on words is mine.)
These instructions represent what I actually do to make the challot, as opposed to what the cookbooks usually say. I've streamlined the process for my own needs, based on the tools I own. Your mileage may vary.Got the yeast down pat? Great. So the First step is as follows:
I buy the yeast in bulk at Costco for $2.99/2 lbs. This amount usually last me for many months of constant baking. I keep it in a glass container in the refrigerator, with a dedicated coffee scoop (2 Tablespoons) kept in the container.
Most recipes call for one "packet" of yeast. One packet is just under one tablespoon. I always round up, most times doubling, the amount of yeast suggested in recipes. It doesn't discernibly change the flavor, and it makes the dough rise more reliably and faster.
Be sure to add the yeast to the water, not vice-versa. This will prevent yeast clumps and the yeast will dissolve faster.
The water should be 115 degrees F or colder. If the water is too hot, it will kill the yeast. If it is too cold, the yeast will remain dormant, and your bread will either not rise, or take FOREVER to rise. You can test it on your wrist, similar to testing a baby bottle's temperature. I used to have a temperature probe in my microwave oven, so I just heat the water to 115 in the microwave.
Add the yeast to the warm water. Let this sit for 10 minutes or until the yeast is fully dissolved.Now lets move on to the Second Step which is kneading the dough.
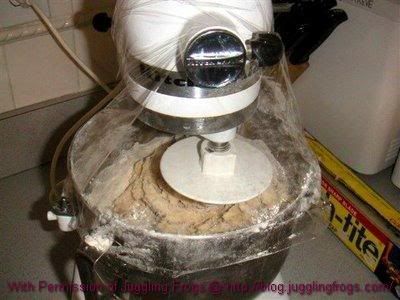
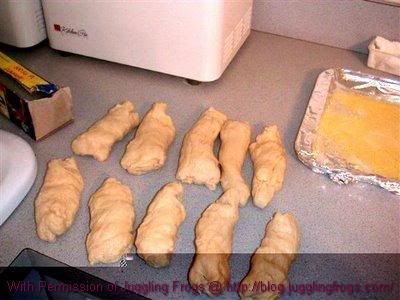
Add the remaining ingredients, bread flour added last. Mix into a dough, rest it for 10 minutes covering with a loose plastic wrap. And while the dough rests, prepare the greased rising bowl and the pans for bakingNow you ask what is "kneading the dough"? Well Carolyn supplies the answer as well.
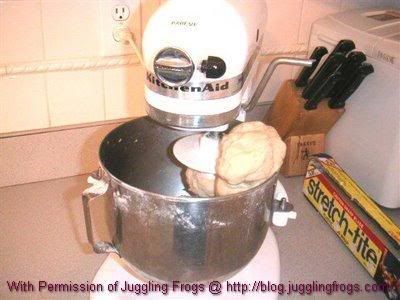
Remove the plastic wrap once the dough absorbs the flour, before it starts to become a cohesive ball. After it forms a dough, let it rest for about 10 minutes before kneading in earnest. (Save that plastic wrap, though. It will come in handy.) If it is the right consistency, you will see the dough ball clean the sides of the mixer bowl. Hand kneading is also a plus even if you are using a mixer.
Preparing The Dough
Kneading In The Mixer
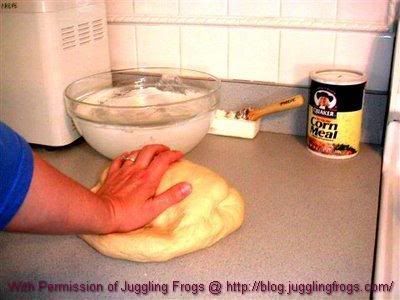
Hand-Kneading As A Finishing Touch
Now what happens when we finish kneading the dough?
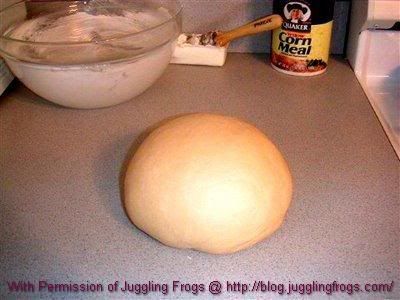
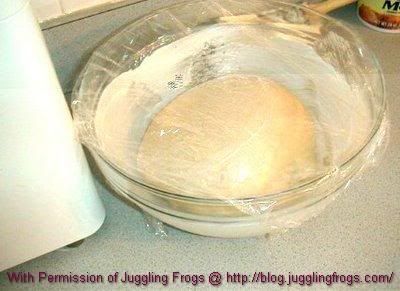
When finished kneading, form the dough into a smooth ball.
Take the ball, place it in the well-greased bowl, twist it all around to cover it in grease from the bowl, and invert, such that the top is also greased. The grease is necessary to allow the dough to rise, unhindered by the friction between the dough and the bowl.
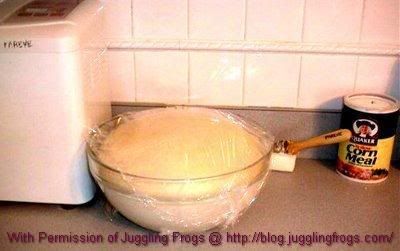
Cover loosely and set aside someplace warm to rise. (You can use the plastic wrap (so conveniently floured) from the mixer-covering step. ) Let the dough rise until doubled in bulk.
Remember what we discussed above about having to take a piece of the dough and burn it. Well if you are a traditional Jew now is the time to remove that piece of dough.
And now you should have as well enough greased pans ready for the Challah you are making. And if you do not, make sure you grease enough pans for the Challah.
And now you should have as well enough greased pans ready for the Challah you are making. And if you do not, make sure you grease enough pans for the Challah.
Greased Pans

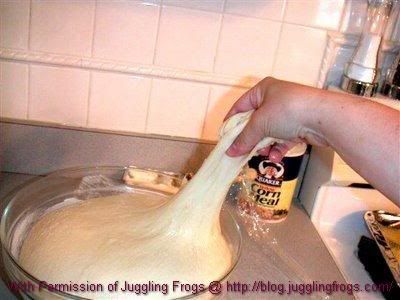
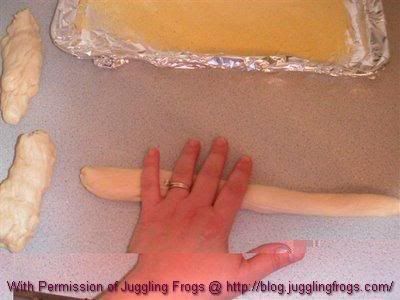
Now we get to the FUN PART! Shaping the Challah.
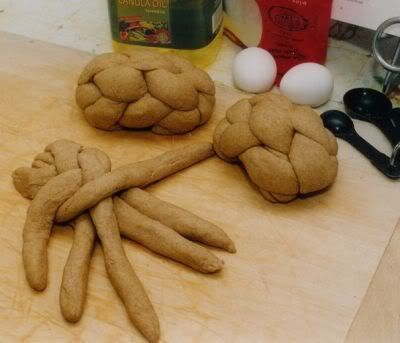
Shaping Challah can be done in a zillion different ways. For now we will show you the basics. It really is not as complicated as it looks, I promise! You do not need 10 hands either. Just go slow and easy and it will work out... Patience is what is demanded here, and don't get frustrated!
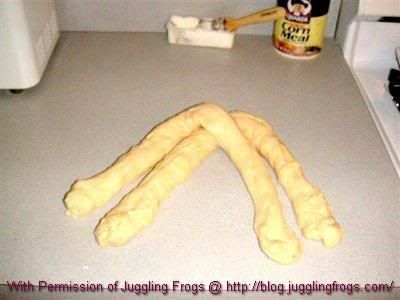
First, squeeze the dough into a very long rope of even thickness.
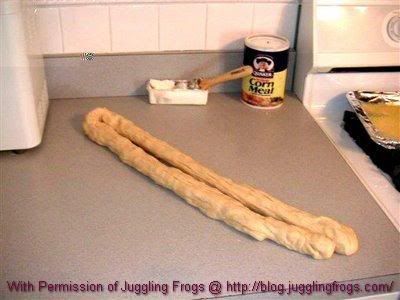
Next, lay the two ropes over one another as in overlapping/nested "v" shapes.
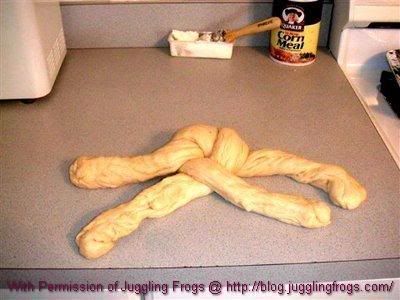
Now cross the inner two legs, then cross each pair of the outer two legs. Repeat this until braid is completed.
There are four "legs" in the picture. Take each of the outside legs and cross it either over or under the inside leg closest to it. (Crossing over it is lower than the inside leg, under if it is higher than the inside leg.)
At this point, you will again have four legs. Repeat the same instruction above (take each of the outside legs and cross it either over or under the inside leg closest to it. Crossing over it is lower than the inside leg, under if it is higher than the inside leg.), with the new four legs.
Continue this way until you have run out of "leg room".
I find braiding this way, with four legs, as opposed to the more standard three legs, much easier to do, as it is symmetrical. Tuck in the ends of the braid.
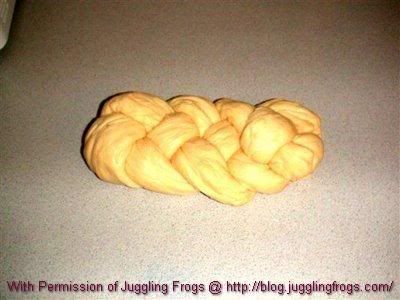
Place in the greased pan, cover in plastic wrap and set aside in warm place to rise.
Believe it or not we are almost done! At least with this first Challah recipe and this part!
Let the dough now rise again until not quite doubled in bulk.
Preheat oven to 350 degrees F.
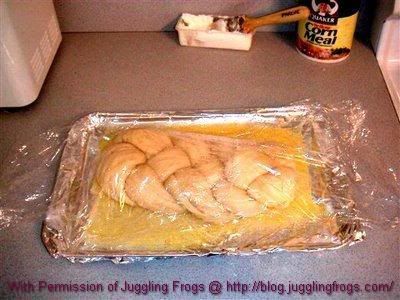
Now as an optional part, you will need a few egg yolks and if you like sesame seeds.
Take the egg yolk and using a brush lightly brush the top of your Challah. Then sprinkle with sesame seeds. Go easy on the egg yolk, unless you like very egg-tasting bread (which some people do!)
Bake in 350 degree F oven for 30 minutes.
Set aside to cool.
Some Useful Notes from Juggling Frogs before the Summary:
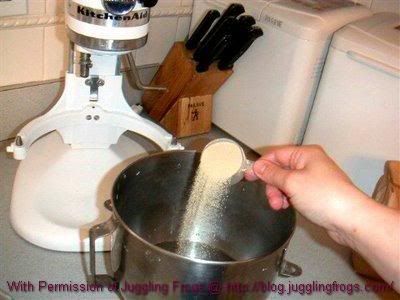
In the picture, you can see my pre-measured bread flour (in the brown paper bag), microwave probe (for heating the water up to, but not above 115 degrees F), a measuring cup with the 17 fluid oz. mark made clearer with the aid of a paint marker, and the glass yeast container I keep in the refrigerator.Summary of Steps:
Although there is a bread machine in the picture (and two in my kitchen), I don't use it for challah making. Bread machines just aren't big enough to make a useful amount of challah, in my opinion. I use a stand mixer to help with the kneading.
I buy the bread flour from a restaurant supply store (or at Costco) in 50 lb. bags (for $10 !) I take the 50 lb. bag and divide it into 2.5 lb. lunch bags. These lunch bags can fit in the door of my stand-alone freezer for storage.
Storing them in the freezer prevents insect infestation. I've adapted the two challah recipes I make each week (this one and the Yekkish/Water Challah) to use 2.5 lb. of flour. It's very convenient to have the flour pre-measured, and to be able to look in the freezer and know how many more batches' worth of flour are available.
Bread flour has a higher gluten content than all purpose flour. It gives it the bread a more chewy, bread-like texture. If you use bread flour in a cake it will be too tough.
- Add the yeast to the warm water. Let this sit for 10 minutes or until the yeast is fully dissolved.
- Add the remaining ingredients, bread flour added last. Mix into a dough, rest it for 10 minutes covering with a loose plastic wrap.
- While the dough rests, prepare the greased rising bowl and the pans for baking.
- Remove the plastic wrap once the dough absorbs the flour, before it starts to become a cohesive ball.
- After it forms a dough, let it rest for about 10 minutes before kneading in earnest. (Save that plastic wrap, though. It will come in handy.)
- If it is the right consistency, you will see the dough ball clean the sides of the mixer bowl.
- Hand kneading is also a plus even if you are using a mixer.
- When finished kneading, form the dough into a smooth ball.
- Take the ball, place it in the well-greased bowl, twist it all around to cover it in grease from the bowl, and invert, such that the top is also greased. The grease is necessary to allow the dough to rise, unhindered by the friction between the dough and the bowl.
- Cover loosely and set aside someplace warm to rise. (You can use the plastic wrap (so conveniently floured) from the mixer-covering step. )
- Let dough rise until doubled in bulk.
- Remember what we discussed above about having to take a piece of the dough and burn it. Well if you are a traditional Jew now is the time to remove that piece of dough.
- Squeeze the dough into a very long rope of even thickness.
- Next, lay the two ropes over one another as in overlapping/nested "v" shapes.
- Cross the inner two legs, then cross each pair of the outer two legs. Repeat this until braid is completed.
- Take each of the outside legs and cross it either over or under the inside leg closest to it. (Crossing over it is lower than the inside leg, under if it is higher than the inside leg.)
- At this point, you will again have four legs. Repeat the same instruction above (take each of the outside legs and cross it either over or under the inside leg closest to it. Crossing over it is lower than the inside leg, under if it is higher than the inside leg.), with the new four legs.
- Continue this way until you have run out of "leg room".
- Tuck in the ends of the braid.
- Place in the greased pan, cover in plastic wrap and set aside in warm place to rise.
- Let rise again until not quite doubled in bulk.
- Preheat oven to 350º Fahrenheit.
- Optional: Brush gently with egg yolk. Sprinkle with sesame seeds. -Take the egg yolk and using a brush lightly brush the top of your Challah. Then sprinkle with sesame seeds. Go easy on the egg yolk, unless you like very egg-tasting bread (which some people do!)
- Bake in 350º Fahrenheit oven for 30 minutes.
- Set aside to cool.
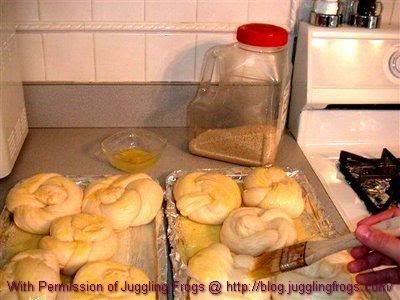
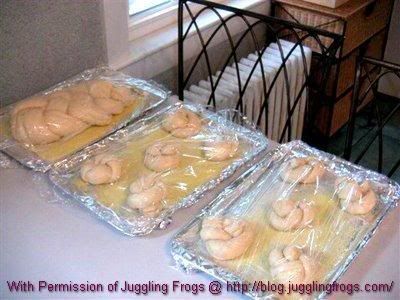
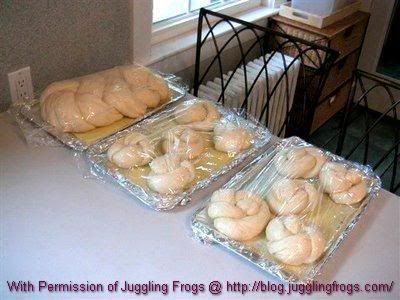
Shaping Rolls
Now that you are an expert Challah maker, here is where you can make rolls or small Challot. This runs along the same process as above, except that rolls should bake in 350º Fahrenheit oven for 18 minutes.
So Here We Go:
Step #1: Separate the dough into 10-12 parts.
Step #2: Roll each part into a thin "snake"
Step #3: Tie in a single knot
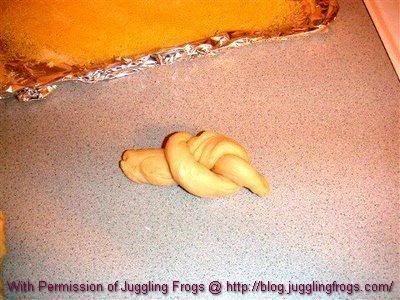
Step #4: Tuck in the ends to secure
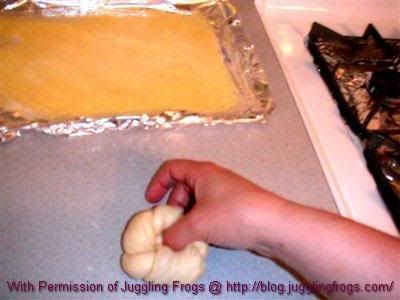
Step #5: After shaping, set them aside to rise.
Step #6: After rising, ready to bake
Remember: Bake in 350º Fahrenheit oven for 18 minutes.
Water Challah (No Eggs)
Now we are done with regular Challah and rolls it is time to move on the "Water Challah" made without eggs. Since you are already a world class Challah baker this should be a cinch!
Ingredients For Water Challah:
- 3 cups warm water (=24 fl. oz.)
- 2 Tbsp. (or two packets or one coffee scoop) dry yeast
- 1/4 cup sugar
- 2 Tbsp. salt
- 1/4 cup. oil
- 2 ½ lbs. flour
These are basically the same as above.
- Let rise
- Take challah and shape it
- Let rise again.
- Bake in a 400º Fahrenheit oven for 40 minutes for a chewy interior and crispy crust.
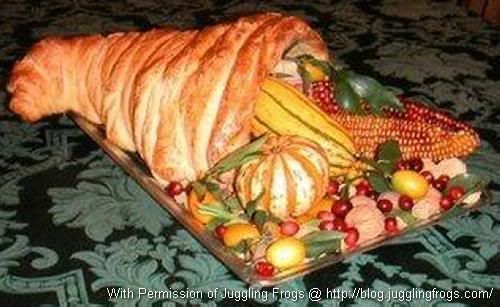
Bread Cornucopia
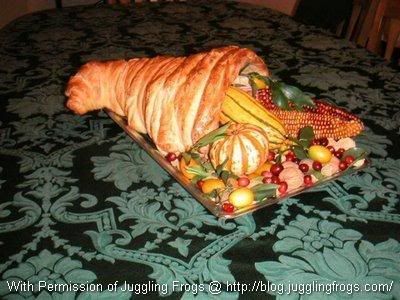
Well if you have not guessed it yet, you have become a true baker. So with Carolyn's permission I am going to give you the absolute coolest bread creation I have yet to see. This is not really for Challah - but with all the instructions above, if you are a bit creative, this could be an incredible dish for your table. So get ready for a wild ride on bread!
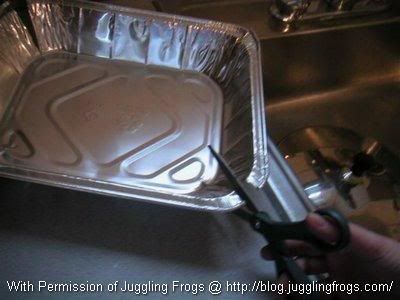
You will need the ingredients from the regular Challah or the Water Challah whichever suits your tastes for this one. Most of the trick here is in shaping the dough and making the mold.
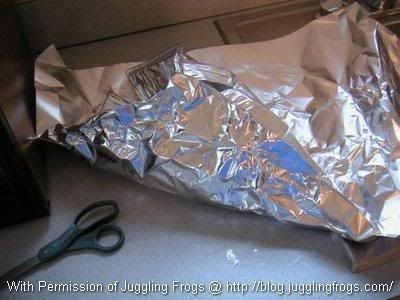
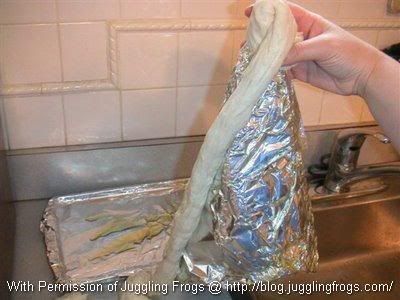
Step #1: Cut a foil pan's corners so that it will lie flat.
Step #2: Roll the foil pan into a cone shape and secure with duct tape.
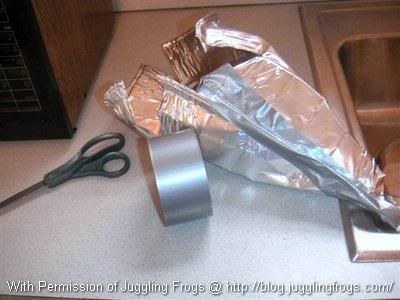
Step #3: Cover with heavy duty aluminum foil.
Step #4: Spray generously with oil.
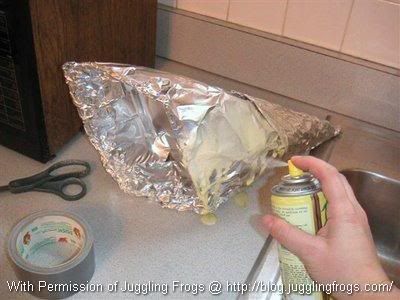
Step #5: Place oiled foil mold on a cookie sheet and make a large recipe of bread dough.
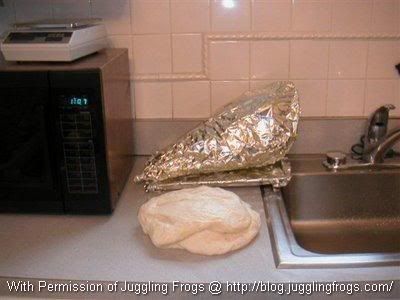
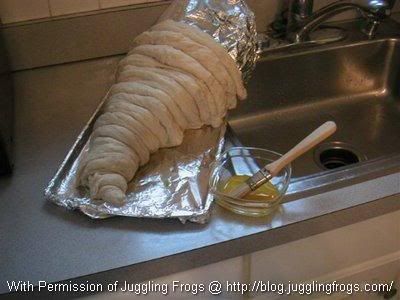
Step #6: Roll the bread into long, thin snakes.
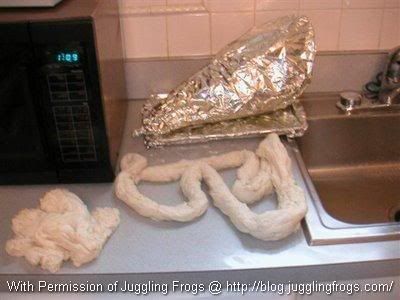
Step #7: Starting at the tip, wind the dough around the oiled foil cone.
Step #8: After allowing to rise a bit, brush with diluted egg yolk and bake until golden brown. (Should be in a 350º Fahrenheit oven for 20-30 minutes)
The following note from Carolyn is actually the most astounding part of this recipe!
From 2004 - Including the ornamental Indian Corn, but not including the reusable nuts and vegetables, this (theoretically edible) centerpiece cost less than $3 to make.
 Obviously without Carolyn over @ Juggling Frogs this post would never have been possible. My sincere thanks go to her and her kind permission to reprint much of her Challah and bread recipes. Of course it gets a 5 star for difficulty. But once you have this down, making bread could never be easier. Of course there is always the bread machine, but, there is nothing like Home Baked Challah and Bread. So if you have the time and want to really learn how to bake, go for it! Even if you never make it at home, now you are initiated into the secrets and mystery of bread making and Great Challah. - Added later - Carolyn does not think this deserves a 5 star for difficulty. She feels it is fairly easy to make (see comments on post). While I will not disagree it is easy to make for those with the willpower, it does take a bit of "kitchen sense" and do not forget that braiding the Challah for a new-comer is hard!
Tags:


Comments
That is just amazing. Thank you for the links and all of your kind words.
I have only three corrections:
1. You are not full of chutzpah, but energy, enthusiasm, and fantastic ideas. This post (and the idea to create it) was very generous and useful, and the opposite of chutzpah.
2. The Yekkish/no-egg/water challah recipe was adapted (by me)from Shuli Gutman's recipe.
I tried many recipes that didn't get the crust or chewiness right, before finding hers. I then experimented, tweaking the ingredients for our most preferred taste and to use a minimum of measuring cups/spoons (something I frequently do with oft-used recipes).
3. I disagree with the five star difficulty rating. While it is time-consuming, bread baking is so much more forgiving than regular baking. Even when multiple steps in the recipe are not followed well, the imperfect loaves are so much better, fresh from the oven, than most store-bought breads.
Yes, there are a few opportunities for disaster (dead yeast, over-rising, etc.), but really, it's very easy to make delicious bread.
After a bit of practice, I bet your readers will want to find a way to incorporate challah baking into the weekly routine, if only for the way it makes the house smell on a Friday afternoon.
For those trying this for the first time on a Friday morning, I recommend buying a pair of store-bought challot and tossing them in your freezer.
If disaster strikes, you'll still have challot for Shabbat.
If not, keep them in the freezer for another week.
With luck, that pair of store-bought challot will be stuck in the freezer until the week before Pesach, when you might not want to have to bake, anyway!
Thank you again and again, Ted, for this fantastic and informative article.
"Though the rules of challah originally applies to ALL DOUGH that was kneaded and made into bread."
This is ambiguous. The laws of challah apply to any large quantity of dough or batter intended for baking. There is no difference between challah dough and oatmeal cookie dough; "challah" must be separated for both.
You are 100% correct and edited the sentence in question - of course attributing it to you on the post itself.
Carolyn:
Hah! Just looking at the way you braided that dough made me wish for 10 hands with six fingers on each! Seriously though, for newcomers it is a difficult thing to get a hold of. You are an experienced chef. What is easy to you - is like incredibly difficult for us normal mortals!
Teddy
I trust you're sending the link to KCC!!
I'll never forget my first attempt at baking challah. It was my first acquaintance with yeast dough, too.
ps I prefer having/using dehydrated yeast. I used to get inflamations of my fingernails from using fresh yeast.
Once you know what you're doing, however, bread dough is easier cos the strands stay in place by themselves. :)
I'll never forget my first attempt at baking challah. It was my first acquaintance with yeast dough, too.
ps I prefer having/using dehydrated yeast. I used to get inflamations of my fingernails from using fresh yeast.